延迟任务
什么是延迟任务
定时任务:有固定周期的,有明确的触发时间
延迟任务:没有固定的开始时间,它常常是由一个事件触发的,而在这个事件触发之后的一段时间内触发另一个事件,任务可以立即执行,也可以延迟
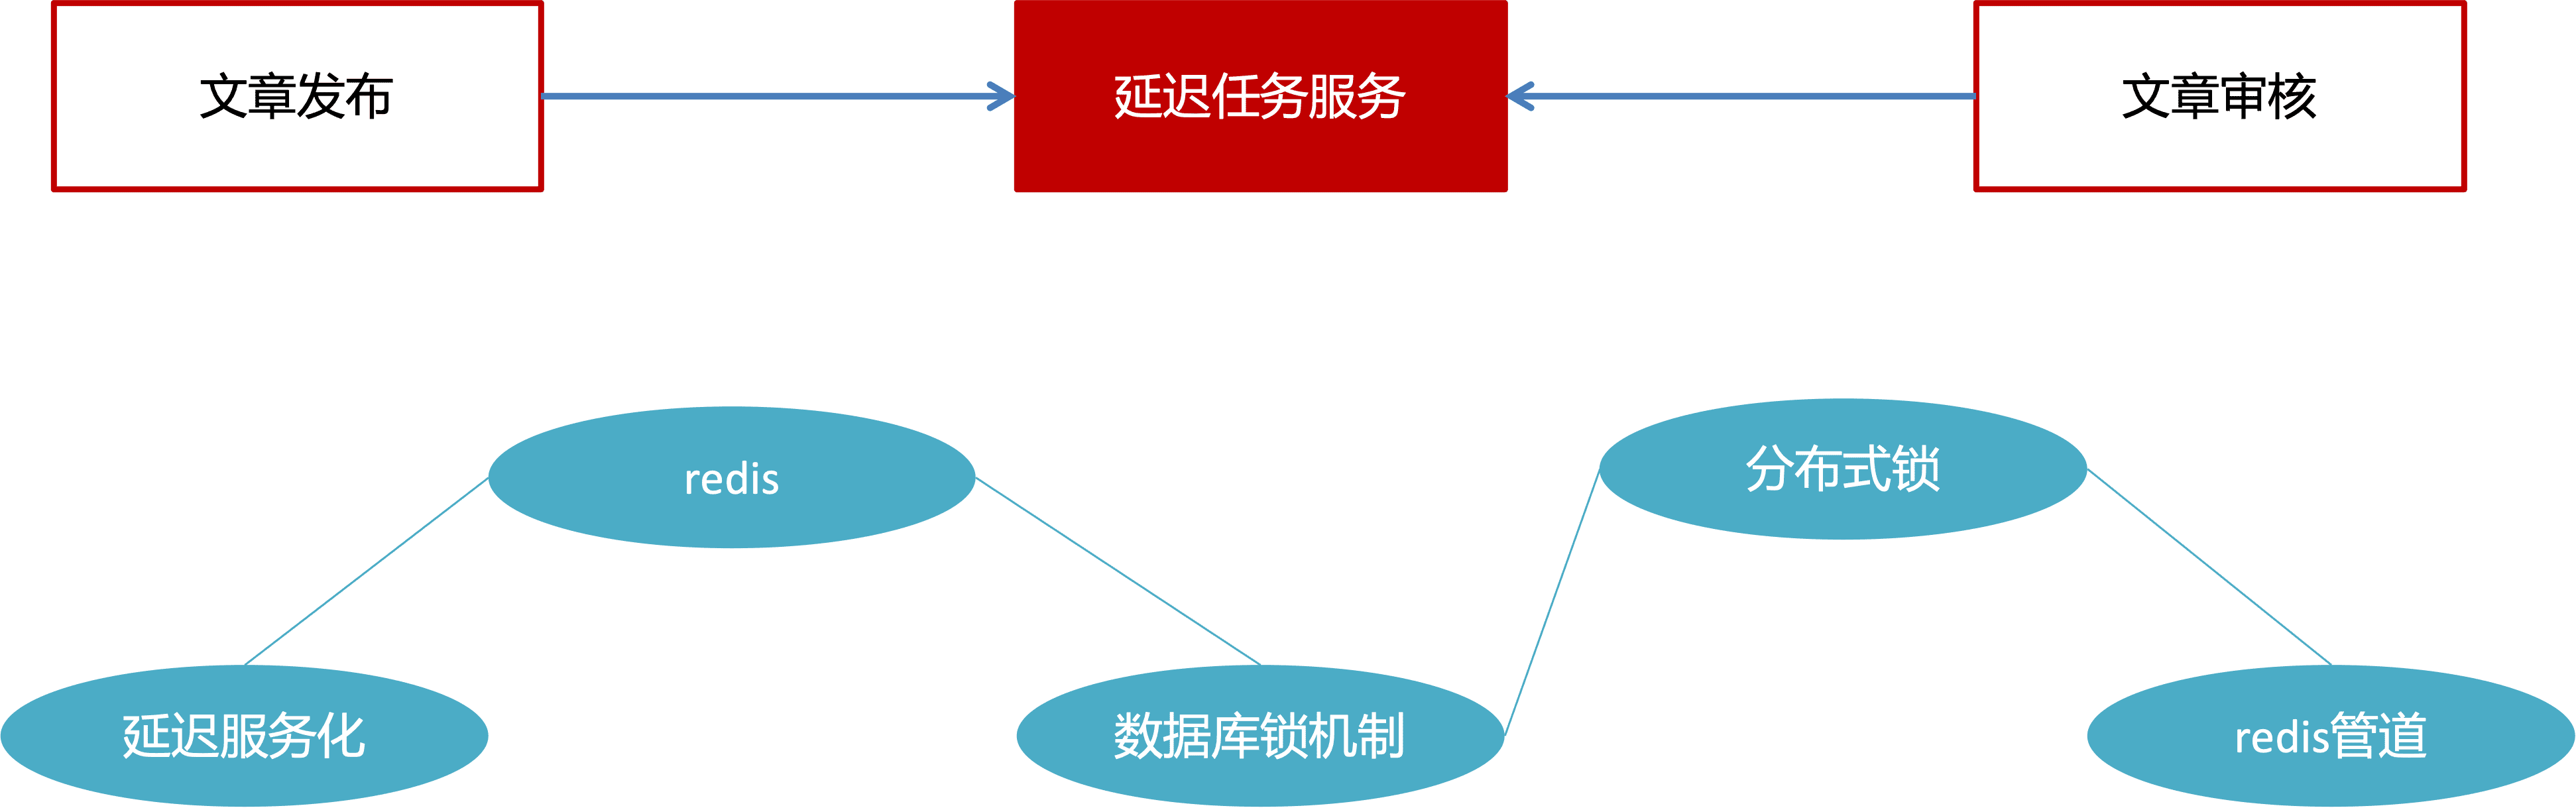
技术对比
DelayQueue
JDK自带DelayQueue 是一个支持延时获取元素的阻塞队列, 内部采用优先队列 PriorityQueue 存储元素,同时元素必须实现 Delayed 接口;在创建元素时可以指定多久才可以从队列中获取当前元素,只有在延迟期满时才能从队列中提取元素
使用DelayQueue作为延迟任务,如果程序挂掉之后,任务都是放在内存,消息会丢失,如何保证数据不丢失
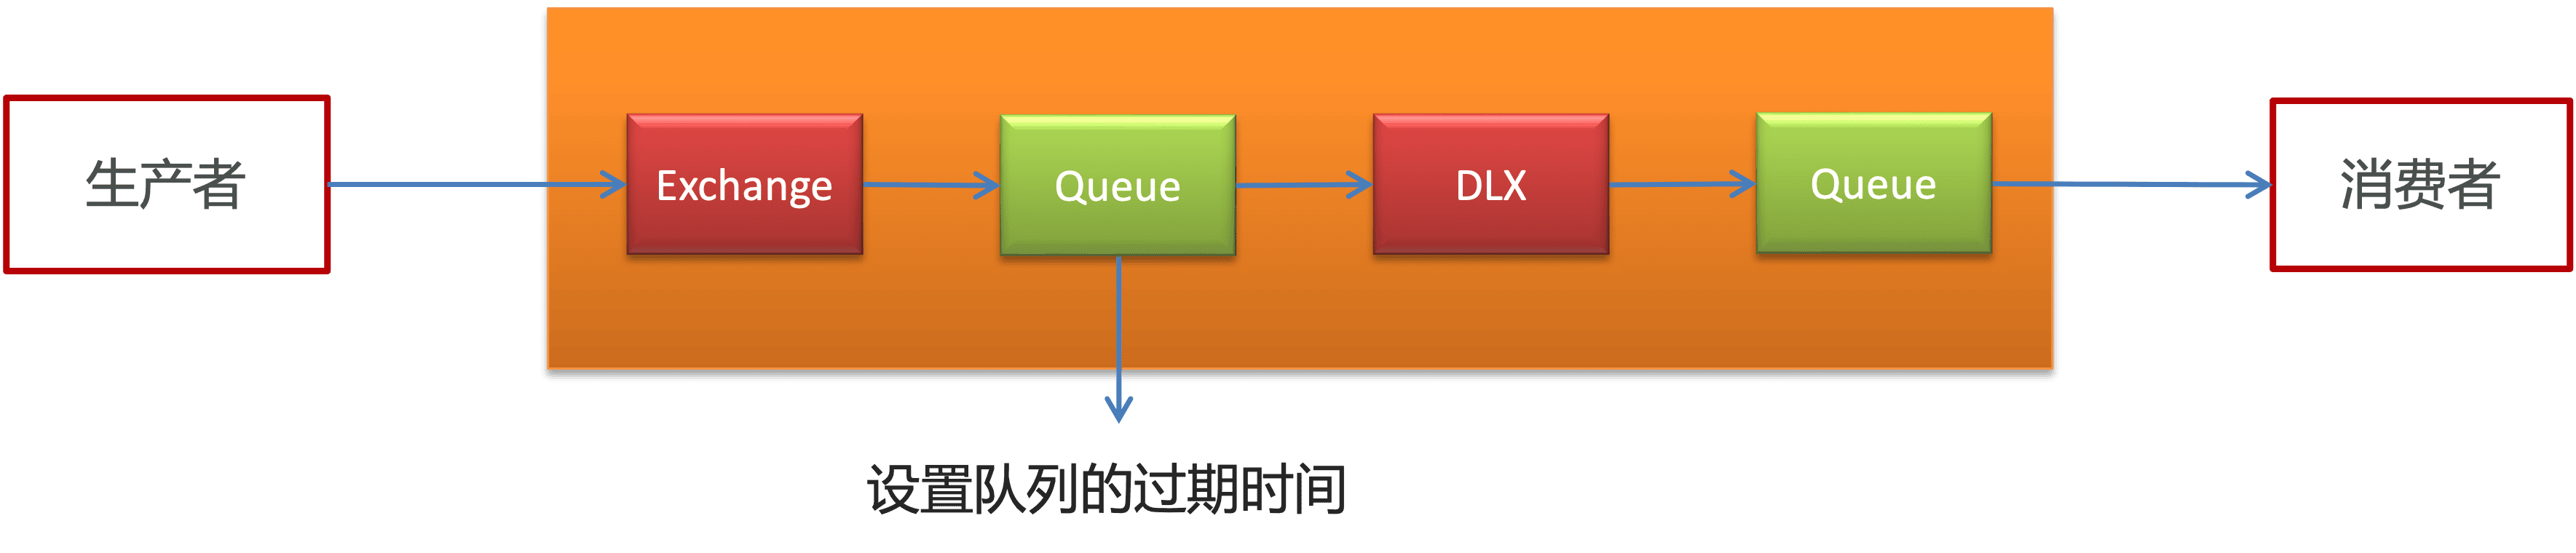
RabbitMQ实现延迟任务
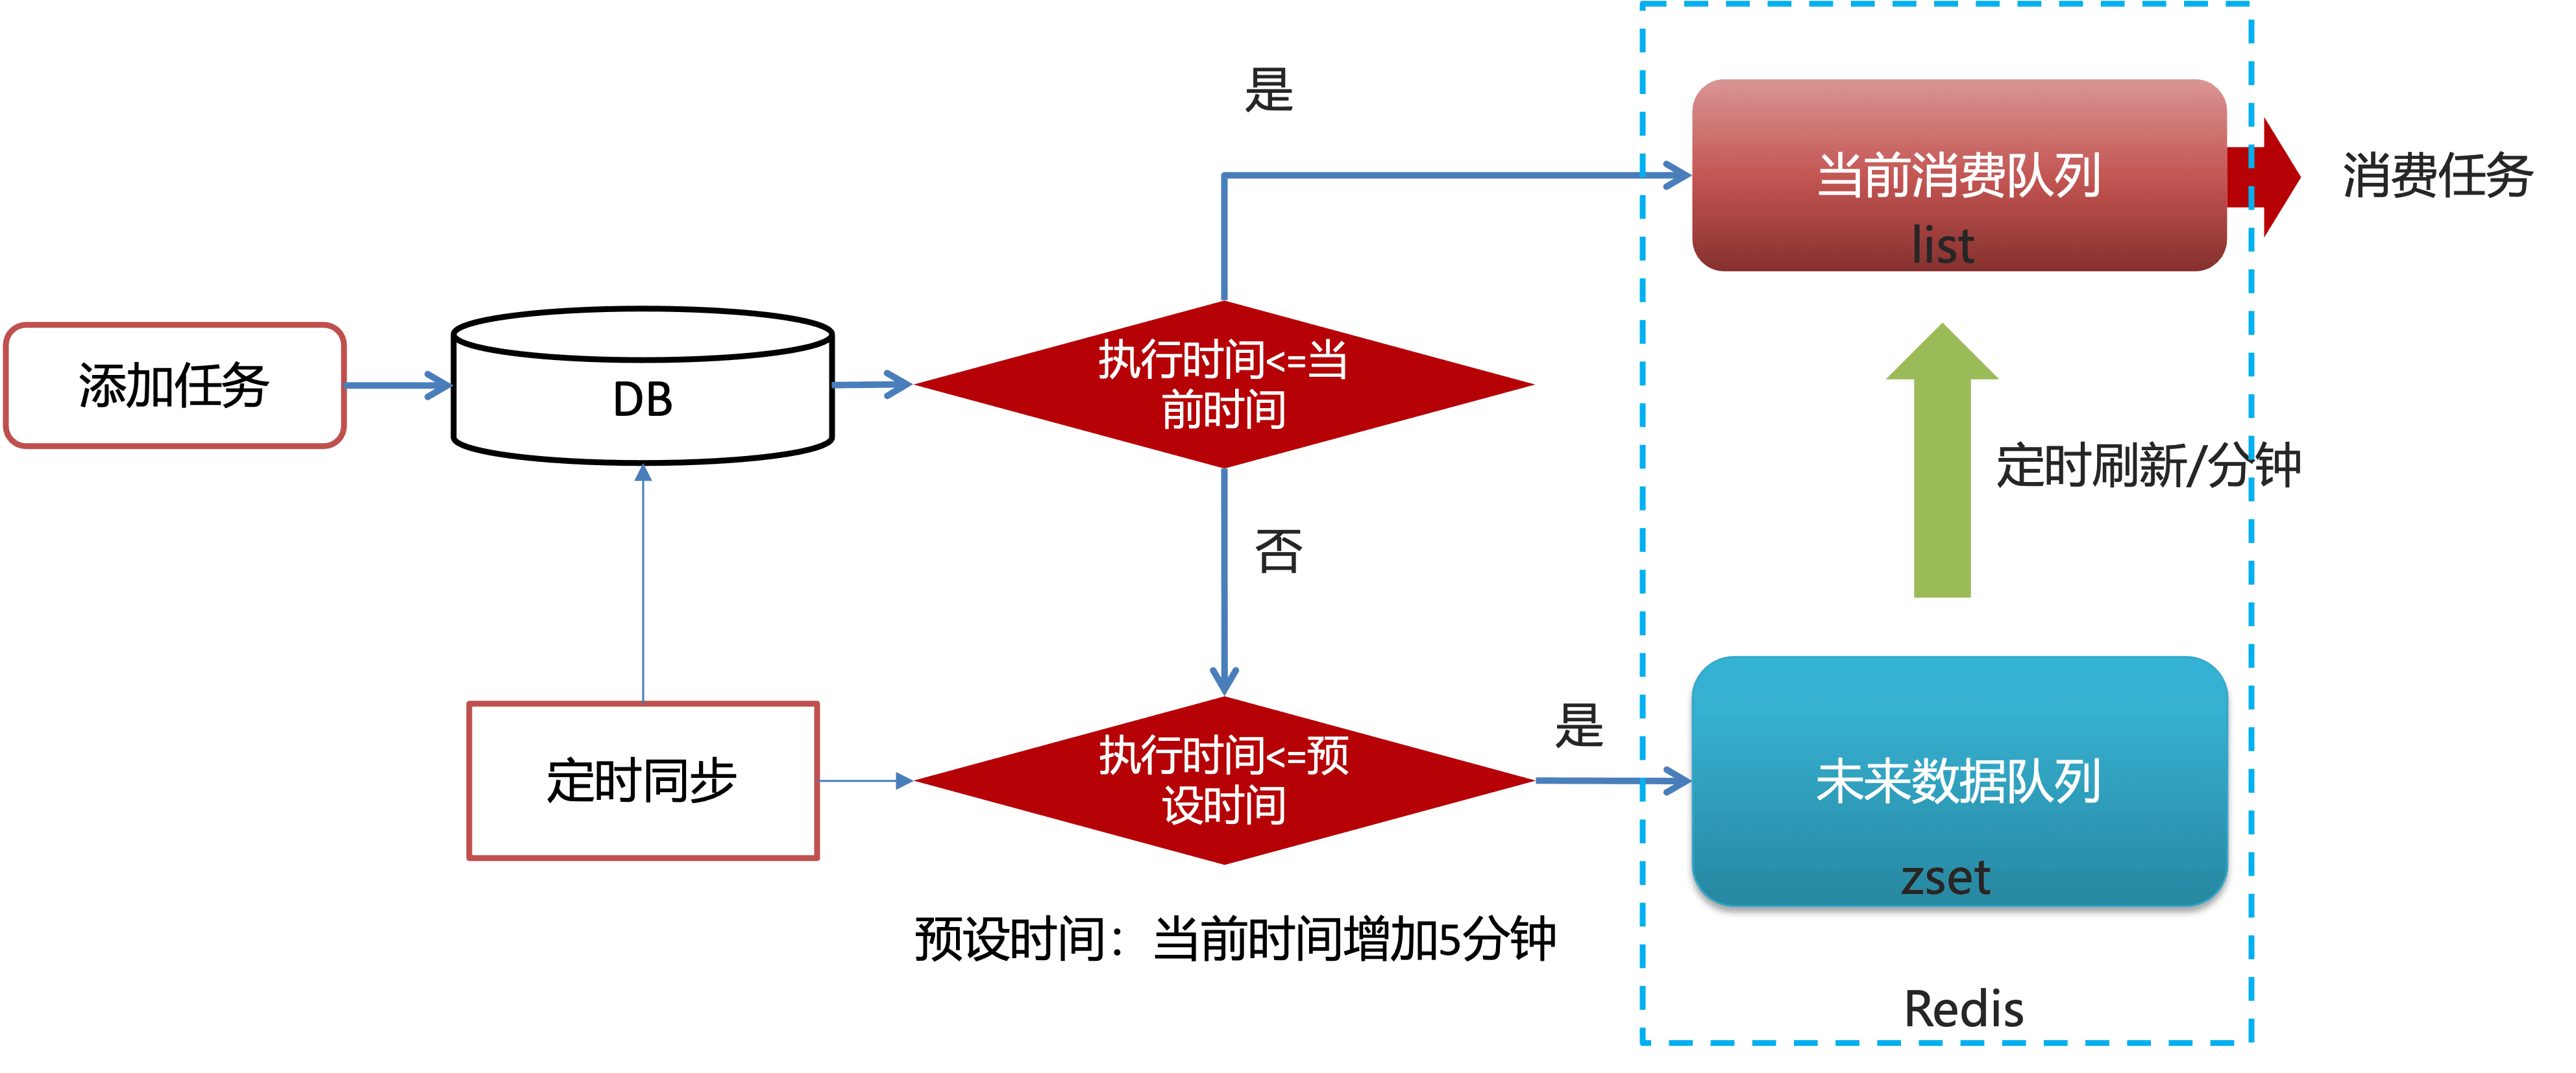
redis实现
zset数据类型的去重有序(分数排序)特点进行延迟。例如:时间戳(毫秒值)作为score进行排序
例如:
生产者添加到4个任务到延迟队列中,时间毫秒值分别为97、98、99、100。当前时间的毫秒值为90,消费者端进行监听,如果当前时间的毫秒值匹配到了延迟队列中的毫秒值就立即消费。
创建服务
首先创建leadnews-schedule模块,在模块中创建com.swx.schedule包
创建启动类
ScheduleApplication@SpringBootApplication
public class ScheduleApplication {
public static void main(String[] args) {
SpringApplication.run(ScheduleApplication.class, args);
}
}
|
配置文件
bootstrap.yamlserver:
port: 51701
spring:
application:
name: leadnews-schedule
cloud:
nacos:
discovery:
server-addr: xxx.xxx.xxx.xxx:8848
config:
server-addr: xxx.xxx.xxx.xxx:8848
file-extension: yml
|
在Nacos配置中心添加如下配置:http://ip:8848/nacos
spring:
  datasource:
    driver-class-name: com.mysql.cj.jdbc.Driver
    url: jdbc:mysql://localhost:3306/leadnews_schedule?serverTimezone=GMT%2B8&useSSL=false&characterEncoding=utf-8&allowPublicKeyRetrieval=true
    username: root
    password: xxxxxxxx
mybatis-plus:
  mapper-locations: classpath*:mapper/*.xml
  type-aliases-package: com.swx.model.schedule.pojo
|
代码生成
使用代码生成器生成基础代码:
CodeGeneratepublic class CodeGenerate {
public static void OnMac() {
AutoGenerator mpg = new AutoGenerator();
GlobalConfig gc = new GlobalConfig();
String projectPath = System.getProperty("user.dir");
gc.setAuthor("sw-code");
gc.setOpen(false);
gc.setFileOverride(true);
gc.setServiceName("%sService");
gc.setSwagger2(false);
gc.setIdType(IdType.ASSIGN_ID);
gc.setDateType(DateType.ONLY_DATE);
mpg.setGlobalConfig(gc);
DataSourceConfig dsc = new DataSourceConfig();
dsc.setUrl("jdbc:mysql:///leadnews_schedule?useSSL=false&serverTimezone=UTC&characterEncoding=utf-8&nullCatalogMeansCurrent=true");
dsc.setDriverName("com.mysql.cj.jdbc.Driver");
dsc.setUsername("root");
dsc.setPassword("swx852345");
mpg.setDataSource(dsc);
PackageConfig pc = new PackageConfig();
pc.setParent("com.swx");
Map<String, String> pathInfo = new HashMap<>();
String packageName = "schedule";
String parentPath = "/src/main/java/com/swx";
String otherPath ="/leadnews-service/leadnews-schedule/src/main/java/com/swx/" + packageName;
String entityPackageName = "schedule";
pc.setEntity("model." + entityPackageName + ".pojo");
pc.setMapper(packageName + ".mapper");
pc.setService(packageName + ".service");
pc.setServiceImpl(packageName + ".service.impl");
pc.setController(packageName + ".controller.v1");
String entityPath = projectPath.concat("/leadnews-model").concat(parentPath).concat("/model/" + entityPackageName + "/pojo");
String mapper_path = projectPath.concat(otherPath).concat("/mapper");
String mapper_xml_path = projectPath.concat("/leadnews-service/leadnews-schedule").concat("/src/main/resources/mapper");
String service_path = projectPath.concat(otherPath).concat("/service");
String service_impl_path = projectPath.concat(otherPath).concat("/service/impl");
String controller_path = projectPath.concat(otherPath).concat("/controller/v1");
pathInfo.put("entity_path",entityPath);
pathInfo.put("mapper_path",mapper_path);
pathInfo.put("xml_path",mapper_xml_path);
pathInfo.put("service_path",service_path);
pathInfo.put("service_impl_path",service_impl_path);
pathInfo.put("controller_path",controller_path);
pc.setPathInfo(pathInfo);
mpg.setPackageInfo(pc);
StrategyConfig strategy = new StrategyConfig();
strategy.setInclude("taskinfo", "taskinfo_logs");
strategy.setNaming(NamingStrategy.underline_to_camel);
strategy.setColumnNaming(NamingStrategy.underline_to_camel);
strategy.setEntityLombokModel(true);
strategy.setEntityTableFieldAnnotationEnable(true);
strategy.setRestControllerStyle(true);
strategy.setControllerMappingHyphenStyle(true);
mpg.setStrategy(strategy);
mpg.execute();
}
public static void main(String[] args) {
OnMac();
}
}
|
生成之后,可以把Service全部删掉,用不到
Blob数据
注意修改数据库BLOB类似数据对应的java类型
@TableField("parameters")
private byte[] parameters;
|
乐观锁
添加TaskinfoLogs实体类的乐观锁注解
@Data
@EqualsAndHashCode(callSuper = false)
@TableName("taskinfo_logs")
public class TaskinfoLogs implements Serializable {
....;
@Version
@TableField("version")
private Integer version;
....;
}
|
添加配置文件
config.MyBatisPlusConfig@Configuration
@MapperScan("com.swx.schedule.mapper")
public class MyBatisPlusConfig {
@Bean
public MybatisPlusInterceptor optimisticLockerInnerInterceptor() {
MybatisPlusInterceptor interceptor = new MybatisPlusInterceptor();
interceptor.addInnerInterceptor(new OptimisticLockerInnerInterceptor());
return interceptor;
}
}
|
Redis实现延迟任务
实现思路
安装Redis
使用Docker安装redis
创建容器
docker run -d --name redis --restart=always -p 6379:6379 redis --requirepass "leadnews"
|
集成Redis
引入Redis相关依赖
pom.xml<dependencies>
<dependency>
<groupId>org.springframework.boot</groupId>
<artifactId>spring-boot-starter-data-redis</artifactId>
</dependency>
<dependency>
<groupId>org.apache.commons</groupId>
<artifactId>commons-pool2</artifactId>
</dependency>
</dependencies>
|
在Nacos中添加配置信息
spring:
  redis:
    host: xxx.xxx.xxx.xxx
    password: leadnews
    port: 6379
|
枚举常量
任务状态枚举类
TaskLogStatuspublic enum TaskLogStatus {
SCHEDULED(0, "初始化状态"),
EXECUTED(1, "已执行状态"),
CANCELLED(2, "已取消状态");
private int status;
private String desc;
TaskLogStatus(int status, String desc) {
this.status = status;
this.desc = desc;
}
public int status() {
return status;
}
public String desc() {
return desc;
}
}
|
常量类
ScheduleConstantspublic class ScheduleConstants {
public static final String REDIS_KEY_FUTURE = "future_";
public static final String REDIS_KEY_TOPIC = "topic_";
public static final String FUTURE_TASK_SYNC = "FUTURE_TASK_SYNC";
public static final Integer DEFAULT_TIME_MINUTE = 5;
public static final Integer LOCK_TIME_MILLISECONDS = 1000 * 30;
}
|
添加任务
- 添加小于当前时间的到List中,即立即审核
- 添加大于当前时间但小于当前时间加5分钟的放到ZSet中,即延迟审核
- 所有的任务均保存到数据库中,当大于当前时间加5分钟只会在数据库中,后期刷新到Redis中
创建TaskService接口,定义添加任务方法:
TaskServicepublic interface TaskService {
public long addTask(Task task);
}
|
实现该接口和添加任务的方法:
TaskServiceImpl@Slf4j
@Service
public class TaskServiceImpl implements TaskService {
private final TaskinfoMapper taskinfoMapper;
private final TaskinfoLogsMapper taskinfoLogsMapper;
private final CacheService cacheService;
public TaskServiceImpl(TaskinfoMapper taskinfoMapper, TaskinfoLogsMapper taskinfoLogsMapper, CacheService cacheService) {
this.taskinfoMapper = taskinfoMapper;
this.taskinfoLogsMapper = taskinfoLogsMapper;
this.cacheService = cacheService;
}
@Override
@Transactional(rollbackFor = RuntimeException.class)
public long addTask(Task task) {
boolean success = addTaskToDb(task);
if (!success) {
throw new RuntimeException("事务添加到数据库失败");
}
addTaskToRedis(task);
return task.getTaskId();
}
private void addTaskToRedis(Task task) {
String key = task.getTaskType() + "_" + task.getPriority();
Calendar instance = Calendar.getInstance();
instance.add(Calendar.MINUTE, ScheduleConstants.DEFAULT_TIME_MINUTE);
long nextScheduleTime = instance.getTimeInMillis();
if (task.getExecuteTime() <= System.currentTimeMillis()) {
cacheService.lLeftPush(ScheduleConstants.REDIS_KEY_TOPIC + key, JSON.toJSONString(task));
} else if (task.getExecuteTime() <= nextScheduleTime) {
cacheService.zAdd(ScheduleConstants.REDIS_KEY_FUTURE + key, JSON.toJSONString(task), task.getExecuteTime());
}
}
private boolean addTaskToDb(Task task) {
Taskinfo taskinfo = new Taskinfo();
BeanUtils.copyProperties(task, taskinfo);
taskinfo.setExecuteTime(new Date(task.getExecuteTime()));
int insert = taskinfoMapper.insert(taskinfo);
task.setTaskId(taskinfo.getTaskId());
TaskinfoLogs taskinfoLogs = new TaskinfoLogs();
BeanUtils.copyProperties(taskinfo, taskinfoLogs);
taskinfoLogs.setVersion(1);
taskinfoLogs.setStatus(TaskLogStatus.SCHEDULED.status());
int insert1 = taskinfoLogsMapper.insert(taskinfoLogs);
return insert > 0 && insert1 > 0;
}
}
|
取消任务
场景:第三接口网络不通,使用延迟任务进行重试,当达到阈值以后,取消任务。
根据taskid删除任务,修改任务日志状态为 2(取消)
删除redis中对应的任务数据,包括list和zset
定义抽象方法
TaskService
public boolean cancelTask(long taskId);
|
实现该方法
TaskServiceImpl
@Override
@Transactional(rollbackFor = Exception.class)
public boolean cancelTask(long taskId) {
Task task = updateDb(taskId, TaskLogStatus.CANCELLED.status());
if (task == null) return false;
removeTaskFromCache(task);
return true;
}
private Task updateDb(long taskId, int status) {
taskinfoMapper.deleteById(taskId);
TaskinfoLogs taskinfoLogs = taskinfoLogsMapper.selectById(taskId);
if (taskinfoLogs == null) {
return null;
}
taskinfoLogs.setStatus(status);
taskinfoLogsMapper.updateById(taskinfoLogs);
Task task = new Task();
BeanUtils.copyProperties(taskinfoLogs, task);
task.setExecuteTime(taskinfoLogs.getExecuteTime().getTime());
return task;
}
private void removeTaskFromCache(Task task) {
String key = task.getTaskType() + "_" + task.getPriority();
if (task.getExecuteTime() <= System.currentTimeMillis()) {
cacheService.lRemove(ScheduleConstants.REDIS_KEY_TOPIC + key, 0, JSON.toJSONString(task));
} else {
cacheService.zRemove(ScheduleConstants.REDIS_KEY_FUTURE + key);
}
}
|
消费任务
- 从Redis的list中pop数据
- 删除任务并且修改日志状态
定义抽象方法
TaskService
public Task poll(int type, int priority);
|
实现抽象方法
@Override
@Transactional(rollbackFor = Exception.class)
public Task poll(int type, int priority) {
String key = type + "_" + priority;
String taskJson = cacheService.lRightPop(ScheduleConstants.REDIS_KEY_TOPIC + key);
if (!StringUtils.hasText(taskJson)) {
return null;
}
Task task = JSON.parseObject(taskJson, Task.class);
updateDb(task.getTaskId(), TaskLogStatus.EXECUTED.status());
return task;
}
|
定时刷新
将ZSet中的数据定时刷新到List中去,进行消费
TaskServiceImpl
@Scheduled(cron = "0 */1 * * * ?")
public void refresh() {
String token = cacheService.tryLock(ScheduleConstants.FUTURE_TASK_SYNC, ScheduleConstants.LOCK_TIME_MILLISECONDS);
if (StringUtils.hasText(token)) {
log.info("未来数据定时刷新--定时任务");
Set<String> futureKeys = cacheService.scan(ScheduleConstants.REDIS_KEY_FUTURE + "*");
for (String futureKey : futureKeys) {
String topicKey = ScheduleConstants.REDIS_KEY_TOPIC + futureKey.split(ScheduleConstants.REDIS_KEY_FUTURE)[1];
Set<String> tasks = cacheService.zRangeByScore(futureKey, 0, System.currentTimeMillis());
if (!tasks.isEmpty()) {
cacheService.refreshWithPipeline(futureKey, topicKey, tasks);
log.info("成功的将" + futureKey + "刷新到了" + topicKey);
}
}
}
}
|
延迟任务抢占
如果有两个schedule服务启动,没太服务器都会去执行refresh定时任务,会出现任务抢占的现象。
分布式锁:控制分布式系统有序的去对共享资源进行操作,通过互斥来保证数据的一致性
分布式锁的解决方案:
| 方案 |
说明 |
| 数据库 |
基于表的唯一索引 |
| zookeeper |
根据zookeeper中的临时有序节点排序 |
| redis |
使用SETNX命令完成 |
使用Redis实现锁
CacheService
public String tryLock(String name, long expire) {
name = name + "_lock";
String token = UUID.randomUUID().toString();
RedisConnectionFactory factory = stringRedisTemplate.getConnectionFactory();
RedisConnection connection = factory.getConnection();
try {
Boolean result = connection.set(
name.getBytes(),
token.getBytes(),
Expiration.from(expire, TimeUnit.MILLISECONDS),
RedisStringCommands.SetOption.SET_IF_ABSENT
);
if (result != null && result) {
return token;
}
} finally {
RedisConnectionUtils.releaseConnection(connection, factory, false);
}
return null;
}
|
修改定时刷新逻辑
TaskServiceImpl
@Scheduled(cron = "0 */1 * * * ?")
public void refresh() {
String token = cacheService.tryLock(ScheduleConstants.FUTURE_TASK_SYNC, ScheduleConstants.LOCK_TIME_MILLISECONDS);
if (StringUtils.hasText(token)) {
log.info("未来数据定时刷新--定时任务");
Set<String> futureKeys = cacheService.scan(ScheduleConstants.REDIS_KEY_FUTURE + "*");
for (String futureKey : futureKeys) {
String topicKey = ScheduleConstants.REDIS_KEY_TOPIC + futureKey.split(ScheduleConstants.REDIS_KEY_FUTURE)[1];
Set<String> tasks = cacheService.zRangeByScore(futureKey, 0, System.currentTimeMillis());
if (!tasks.isEmpty()) {
cacheService.refreshWithPipeline(futureKey, topicKey, tasks);
log.info("成功的将" + futureKey + "刷新到了" + topicKey);
}
}
}
}
|
常量定义
ScheduleConstantspublic static final String FUTURE_TASK_SYNC = "FUTURE_TASK_SYNC;
public static final Integer LOCK_TIME_MILLISECONDS = 1000 * 30;
|
数据库任务同步到Redis
TaskServiceImpl
@PostConstruct
@Scheduled(cron = "0 */5 * * * ?")
public void reloadData() {
clearCache();
Calendar instance = Calendar.getInstance();
instance.add(Calendar.MINUTE, ScheduleConstants.DEFAULT_TIME_MINUTE);
List<Taskinfo> taskinfos = taskinfoMapper.selectList(Wrappers.<Taskinfo>lambdaQuery().lt(Taskinfo::getExecuteTime, instance.getTime()));
if (taskinfos!=null&& !taskinfos.isEmpty()) {
for (Taskinfo taskinfo : taskinfos) {
Task task = new Task();
BeanUtils.copyProperties(taskinfo, task);
task.setExecuteTime(taskinfo.getExecuteTime().getTime());
addTaskToRedis(task);
}
}
log.info("数据库的任务同步到了Redis");
}
public void clearCache() {
Set<String> topicKeys = cacheService.scan(ScheduleConstants.REDIS_KEY_TOPIC + "*");
Set<String> futureKeys = cacheService.scan(ScheduleConstants.REDIS_KEY_FUTURE + "*");
cacheService.delete(topicKeys);
cacheService.delete(futureKeys);
}
}
|
对外提供服务
在leadnews-feign-api模块中创建包com.swx.apis.schedule
在该包下创建IScheduleClient接口,内容如下:
IScheduleClient@FeignClient("leadnews-schedule")
public interface IScheduleClient {
@PostMapping("/api/v1/task/add")
public R addTask(@RequestBody Task task);
@GetMapping("/api/v1/task/{taskId}")
public R cancelTask(@PathVariable("taskId") long taskId);
@GetMapping("/api/v1/task/{type}/{priority}")
public R poll(@PathVariable("type") int type, @PathVariable("priority") int priority);
}
|
在leadnews-schedule模块中实现该方法
feign.ScheduleClient@RestController
public class ScheduleClient implements IScheduleClient {
private final TaskService taskService;
public ScheduleClient(TaskService taskService) {
this.taskService = taskService;
}
@Override
@PostMapping("/api/v1/task/add")
public R addTask(@RequestBody Task task) {
return R.success(taskService.addTask(task));
}
@Override
@GetMapping("/api/v1/task/{taskId}")
public R cancelTask(@PathVariable("taskId") long taskId) {
return R.success(taskService.cancelTask(taskId));
}
@Override
@GetMapping("/api/v1/task/{type}/{priority}")
public R poll(@PathVariable("type") int type, @PathVariable("priority") int priority) {
return R.success(taskService.poll(type, priority));
}
}
|
异步调用服务
调用添加任务
调用之前,在leadnews-wemedia模块中定义WmNewsTaskService
WmNewsTaskServicepublic interface WmNewsTaskService {
public void addNewsToTask(Integer id, Date publishTime);
}
|
实现这个接口
@Slf4j
@Service
public class WmNewsTaskServiceImpl implements WmNewsTaskService {
private final IScheduleClient scheduleClient;
public WmNewsTaskServiceImpl(IScheduleClient scheduleClient) {
this.scheduleClient = scheduleClient;
}
@Override
@Async
public void addNewsToTask(Integer id, Date publishTime) {
log.info("添加任务到延迟服务中----begin");
Task task = new Task();
task.setExecuteTime(publishTime.getTime());
task.setTaskType(TaskTypeEnum.NEWS_SCAN_TIME.taskType());
task.setPriority(TaskTypeEnum.NEWS_SCAN_TIME.priority());
WmNews wmNews = new WmNews();
wmNews.setId(id);
task.setParameters(ProtostuffUtil.serialize(wmNews));
scheduleClient.addTask(task);
log.info("添加任务到延迟服务中----end");
}
}
|
找到发布文章的方法,将调用异步审核改为调用异步添加队列
WmNewsSubmitServiceImpl@Override
@Transactional(rollbackFor = Exception.class)
public void submitNews(WmNewsDTO dto) {
....;
wmNewsTaskService.addNewsToTask(wmNews.getId(), wmNews.getPublishTime());
}
|
调用拉取任务
在WmNewsTaskService接口中添加如下方法:
WmNewsTaskService
public void scanNewsByTask();
|
实现该方法,这个方法没有主动调用,使用定时任务:
WmNewsTaskServiceImpl
@Override
@Scheduled(fixedRate = 1000)
public void scanNewsByTask() {
log.info("消费任务,审核文章");
R result = scheduleClient.poll(TaskTypeEnum.NEWS_SCAN_TIME.taskType(), TaskTypeEnum.NEWS_SCAN_TIME.priority());
if (result == null) {
log.error("拉取任务失败");
return;
}
if (result.getCode().equals(ResultCodeEnum.SUCCESS.code()) && result.getData() != null) {
Task task = JSON.parseObject(JSON.toJSONString(result.getData()), Task.class);
WmNews wmNews = ProtostuffUtil.deserialize(task.getParameters(), WmNews.class);
wmNewsAutoScanService.autoScanWmNews(wmNews.getId());
}
}
|
在WemediaApplication添加注解@EnableScheduling
WemediaApplication@SpringBootApplication
@EnableDiscoveryClient
@MapperScan("com.swx.wemedia.mapper")
@EnableFeignClients(basePackages = "com.swx.apis")
@EnableAsync
@EnableScheduling
public class WemediaApplication {
public static void main(String[] args) {
SpringApplication.run(WemediaApplication.class, args);
}
}
|